Kitchen Failure Hall of Fame: Shrimp Cakes

Ever since I started this blog, I’ve been lucky in the kitchen. Freakishly lucky. My pizzas have slid easily onto their stones, my seasonings have mostly meshed, and aside from the occasional sauce slip-up, everything’s gone more or less according to plan.

This is not how my life is.

So, I’m bringing things back down to earth with a little trip down kitchen disaster memory lane. First up: shrimp cakes.

For a couple of years, before either one of us really cooked, Pete and I were obsessed with these fish cakes from our local Whole Foods. There were a few different varieties — crab, some kind of whitefish — but we especially loved the shrimp cakes with green onions, which we’d sear on the stove and serve with couscous and a salad for a super-simple, delicious dinner.

But the cakes were pricey — definitely one of those packaged foods where you pay for the convenience. So when we got a food processor for our wedding, I went searching for a shrimp cake recipe. I don’t remember which recipe I found, but I know it looked simple, and besides, I’d checked the ingredients on the Whole Foods package and all it listed was shrimp, onions, bread crumbs, egg, maybe milk, and some seasonings. How hard could it be?

It’s worth noting that at this point in my life, I could confidently make approximately three recipes. I also had never had a food processor, and I didn’t even particularly want one; I wanted a blender, and the food processor attachment just came along for the ride.

So anyway. Into the belly of the food processor went some thawed frozen shrimp, chopped green onions, and a bunch of bread crumbs. I hit the “grind” button and hoped for the best.

I did not get the best.

I got shrimp smoothie.

Much like Theodora’s recent bean burger experiment, I did not just gently crush the shrimp; I obliterated them to the point that they could be sucked through a straw. Unlike Theodora’s bean burgers, I could not salvage them — not even after some eggs, what seemed like a whole loaf of bread crumbs, and a lot of pretending the whole thing never happened.

I’m pretty sure we ate sandwiches that night.

Cauliflower, Shrimp, and Chickpea Stew

I have no idea how to cook for one. To be honest, I have no idea how to cook for two, either, but at least when I’m cooking for two, there are twice as many people eating the leftovers. When it’s just me, well, give me 48 hours and I’m drowning in food.

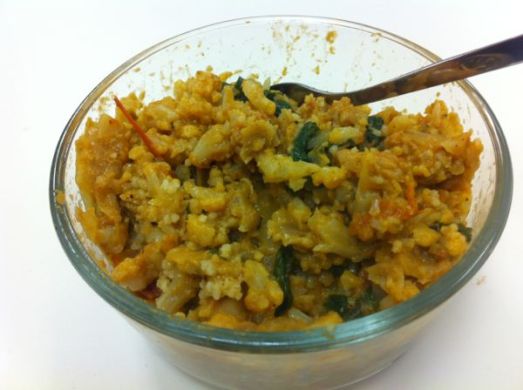
And yet. One day last week, while Pete was traveling, I found myself chopping up a head of cauliflower, throwing some tomatoes in a pot, and making this lovely little stew.

cauliflower stew

The basic idea came from this Real Simple recipe, another find from the recipe binder. The recipe as written was vegetarian, but I had some shrimp in the freezer and figured the flavors would mesh pretty well. (Trader Joe’s tip: the frozen uncooked shrimp are better than the frozen cooked shrimp, which don’t really have a taste.)

I happened to make this recipe on CSA box pickup night, so I used fresh tomatoes instead of canned, and because nobody but me was ever going to eat this, I didn’t bother to remove the tomato skins. I don’t think I even knew until a couple of weeks ago that I was supposed to be removing tomato skins — tomato newbie, remember? — and they don’t bother me at all, but I’m sure peeling the tomatoes wouldn’t hurt.

I had one brief moment of panic when I realized that by using fresh tomatoes, I’d lost some of the liquid that would have come from using canned tomatoes, and 1/2 cup of water wasn’t nearly enough to cover all the vegetables in the pot and bring them to a simmer. I splashed in a little bit of broth that I happened to have in the fridge and hoped for the best. Of course, eventually, the tomatoes released more liquid and I had a bit of a soupy mess on my hand. Another 15 minutes of simmering and all was well.

Even by week-of-many-leftovers standards, this held up well in the fridge and was pretty decent cold (though better once reheated). Not sure how often I’ll have these exact ingredients in the fridge, but if I ever do again, I’ll be coming back to this.

Cauliflower, Shrimp, and Chickpea Stew
(Adapted from Real Simple)

Ingredients
1 medium onion, chopped
28 oz. tomatoes (canned whole or chopped fresh, peeled or not)
15 oz. chickpeas (rinsed and drained)
1 head cauliflower, cut into small florets
5 oz. baby spinach, roughly chopped
6-8 large shrimp, cut into bite-sized pieces
1/2 cup to 1 cup of water or broth
2 Tablespoons olive oil
1 1/2 teaspoons ground cumin
1/2 teaspoon ground ginger
salt and pepper

Instructions
1. Heat the oil in a large saucepan (I used my Dutch oven) over medium heat. Cook the onion until softened.

2. Add the tomatoes (and their liquid, if using canned, or a bit of broth or water if using fresh), cumin, ginger, and salt and pepper, and stir

3. Add the chickpeas, cauliflower, chopped shrimp, and 1/2 cup of water and bring to a boil. If the mixture is too dry, add a bit more water or broth.

4. Reduce heat and simmer for 15-20 minutes, until the cauliflower is tender and the sauce has thickened

5. Remove from heat and, working in batches, stir in the spinach until just wilted.

Serve by itself or over couscous or rice. (Serves four.)

Cheeses I Have Made

Mozzarella
This was the first cheese I made after getting the crazy idea to make cheese put in my head when reading Animal, Vegetable, Miracle. I got a hard cheese kit for Christmas that year, but I guess I hadn’t realized how long it took to make hard cheeses, so I punked out and did the 30-Minute Mozzarella instead.

cheesemaking

I remember we followed the microwave instructions, and the first time, we ended up with this strange rubbery mess. We tossed that, tried again, and got something slightly less rubbery to slice and serve on pizza. Ultimately, though, I ended this day deciding that homemade mozzarella was more trouble than it was worth, especially when the pricey (good, local, organic, etc., but expensive as hell) milk we used cost more than just going to the store and buying fresh mozzarella.

Ricotta
Fresh ricotta, however, completely justified the entire mozzarella-making process. During the first batch, we misread the instructions and didn’t realize we could make even more delicious cheese from our mozzarella leftovers — a huge mistake. The second time around, we ended up with a very, very small amount of ricotta (…I suspect we did something wrong, because by all accounts we should have had more), that we mixed with fresh rosemary snipped from our friend’s garden. It was lovely, and I swore right then that I’d go straight to the ricotta step next time.

Yogurt cheese
Technically I’m not sure this should count as either “making” or “cheese,” but dang, it’s so easy. I mean, the instructions amount to: 1) buy yogurt. 2) dump yogurt into a dish towel. 3) drain. I like to use a quart of whole-milk yogurt, place it in a thin kitchen towel, tie it to my kitchen faucet overnight to drain, and mix it with chives and black pepper, but after I bought cilantro-chive dip from Trader Joe’s and realized it was basically just this, I think I’ll be adding cilantro to my next batch.

fake ricotta

Fake ricotta
If you perhaps aren’t sure what is and is not technically ricotta, the nearly 500 comments on this Smitten Kitchen post are a fascinating read. But whatever you want to call this easy cheese, I made it the other night, and it was delicious and virtually effort-free. I used 3.5 cups of whole milk, a half-cup of cream, some sea salt, and 3 tablespoons of lemon juice and drained it for about 1.5 hours. The cheese tastes surprisingly lemon-y (OK, maybe it shouldn’t have been surprising), but it added a lovely touch to homemade tomato sauce and held its own on crackers (… and green peppers, and pretzels, and virtually anything else that could be dipped in it).

Queso blanco
This one is fun mostly because I get to use a cheese press. So my “cheese press” is just an empty 28-oz. can with the top and bottom lids cut off, but whatever, it’s a cheese press, OK? Making this is pretty much the same as making the fake ricotta linked above, but with 1/4 c. vinegar to every 8 c. milk (I’ve always used cider vinegar because Jam It, Pickle It, Cure It told me to) and transferring the curds to the cheese press to make a pretty disc instead of just draining over a bowl. I still haven’t found a great way to store it and therefore never eat it all before it goes bad, but it’s one of the most satisfying, simple, yet impressive-sounding kitchen projects I’ve done to date.

Spicy Ginger Chicken

Since, oh, 2005, I’ve been talking about organizing my clipped recipes. I started saving recipes — mostly from magazines like Real Simple and Health — when I first started living on my own, back in 2004, and every time I’ve had a significant break since then (the holidays in 2006, before grad school in 2009, and spring break 2011, among others), I’ve imagined sitting down with the big blue folder full of disorganized, grease-stained, piling-up recipes and sorting and culling and sense-making until they were actually useful.

disorganized recipes

And last week, I finally did it.

organized recipes

The exercise turned out to be a fascinating journey through my years in the kitchen. From 2004 and 2005, I had a ton of “heat and dump” recipes — things involving pre-cooked this and pre-shredded that. From 2005 and 2006, when I first started getting serious about making food instead of giving up and going to Taco Bell at midnight, I had a ton of chicken recipes — funny in light of my dislike of cooking chicken. At some point, maybe late 2006, I started to collect dessert recipes. And 2009 to the present brought more elaborate recipes — things from Food and Wine and the New York Times, things involving lamb and immersion blenders and more than 45 minutes in the kitchen. I found the wrinkled original of garden lasagna, the first recipe I felt truly comfortable making; I rediscovered old favorites like chicken/apple/basil salad and sausage with polenta cakes and my first attempt at corn chowder. And I found a few things that made me nostalgic, like recipes from Sassy (1996!) and Jane and lovely party plans from Budget Living. (I kept them all.)

I also found a lot of things — er, most of the recipes I’d saved — that I’d never made. I suppose that’s the hazard of collecting recipes and not having a system to look through them: The things I made regularly rose to the top, totally obscuring the vast stack of goodies underneath. So for the binder’s first real spin, I picked out one of those long-ago-saved, never-before-cooked recipes, a Thai ginger chicken dinner from Real Simple (2006!).

ginger chicken

As I’ve mentioned before on this site, one of the things I want to do is become more comfortable trusting my instincts in the kitchen. I’ve come a long way since I first collected a lot of these recipes, but I still don’t always listen. This turned out to be one of the recipes where I should have trusted my instincts. Two cans of coconut milk seemed like a lot — like, a lot — and yet, it had been a while since I’d cooked with coconut milk and I wasn’t sure how much it would thicken up and besides, I wanted leftovers, didn’t I?

Well. Yes. But not liquid leftovers. One can would have been sufficient for sure.

I did make one good, fun tweak: I realized late in the game that I didn’t have any soy sauce, so I tossed in some Trader Joe’s sweet chili sauce instead. It added some more sweetness but wasn’t cloying (which I’d worried about considering the sheer quantity of coconut milk in the pan), and I added some extra salt to compensate.

The best part of this recipe, for me, was the puree of hot pepper, cilantro, and ginger that got added to the simmering pot. Chopping less, eating sooner? Works for me.

What’s below is the version of this recipe I wish I’d made. My dinner was fine, but I think this’ll be even better.

Spicy Ginger Chicken
(Adapted from Real Simple

Ingredients
1 lb. chicken breasts, cut into bite-sized pieces
1 onion, sliced
1 small eggplant, cut into 1- to 2-inch pieces
1 13.5 oz. can coconut milk or light coconut milk
2 Tablespoons chili sauce, soy sauce, or spicy addition of your choice
2-3 jalapenos or other hot peppers, seeded and roughly chopped
a few sprigs of cilantro, roughly chopped
1 2-inch piece of ginger, peeled and roughly chopped
olive oil
salt
rice of your choice, if desired

Instructions
1. Cook the rice, if using. (Side note: I used basmati, because it was all we had in the house, and I followed a suggestion I saw online to soak it in cold water first, and wow, it came out bright white.)

2. Chop the eggplant, place in a bowl, and salt generously. Let sit for 15 minutes while you chop everything else, then drain, rinse, and pat dry.

3. Heat olive oil in a large saucepan over medium heat. Cook the onion and the eggplant until soft, about 5 minutes.

4. While that’s cooking, put the cilantro, ginger, and hot peppers in a food processor with some olive oil and give them a couple of whirls until they’re finely chopped.

5. Add coconut milk, chili/soy sauce, and some salt to the saucepan and bring to a simmer. Add the cilantro mixture and chicken pieces and simmer until the chicken is cooked through.

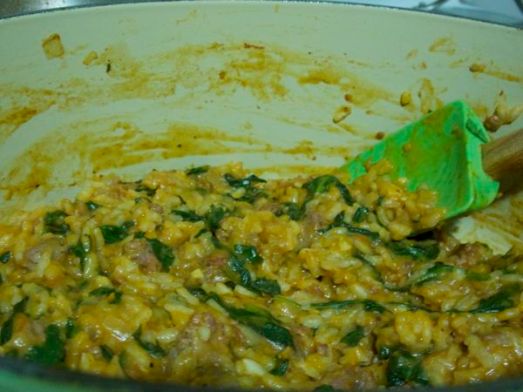
Tomato Risotto with Sausage and Spinach

The second tomatopalooza took over my kitchen, I wanted to make a tomato sauce. But a little Googling on the way there led me on this delicious detour.

All I meant to do was see if anyone had tips for making Smitten Kitchen’s cherry tomato sauce with larger-than-cherry tomatoes. What I ended up doing was peeling and crushing tomatoes, simmering them in water, and standing over a steaming pot for nearly half an hour feeling my hand go numb from constant stirring and desperately trying not to sweat into my dinner.

And it was fabulous.

tomato risotto

I’ve made a number of risottos in my life, but I’ve never used anything but plain broth for the liquid. And because of that, I’m not sure I ever appreciated how fully the cooking liquid infuses into the rice. One minute, my rice was its normal white; the next, it was turning red from the inside out. With spicy sausage browned in the pot, onions so translucent I almost forgot they were there, and spinach wilted in at the last minute, this recipe has a lot going on — but the tomato flavor is clearly the star.

If I’d used canned tomatoes, I’m sure I would have had a lovely result much faster. My insistence on using fresh ones added both time and mess to the cooking (I mean, did you ever think about — I mean, really think about — how juicy a tomato is?). But there was something satisfying about doing it all by hand … and about watching 28 oz. of tomatoes magically disappear from my stash.

Tomato Risotto with Sausage and Spinach
(Adapted from Smitten Kitchen)

Ingredients
28 oz. fresh tomatoes (or 1 28 oz. can diced tomatoes in their juices)
1 tablespoon olive oil
3/4 lb. sweet or hot sausage (I used hot), casings removed
1 small onion, diced
1 cup Arborio rice
1/2 cup white wine
5-6 oz. baby spinach
1/2 cup grated Parmesan
1 tablespoon butter
salt and pepper

Instructions
1. If using fresh tomatoes, bring a large pot of water to a boil. (If using canned tomatoes, skip ahead to step 4.) Cut a shallow X in the skin at the top and the bottom of each tomato. Put ice and cold water in a large bowl and set aside.

2. Working in batches, drop the tomatoes into the boiling water for approximately 1 minute, then plunge the tomatoes into the ice water. When cool enough to handle, the skins should slip off easily.

3. Roughly chop the tomatoes, removing the core. (If you don’t like tomato seeds, this would be the point to remove them; they don’t bother me much, so I didn’t make much effort to remove them beyond what naturally ended up on the cutting board.)

4. Place the chopped tomatoes in a large saucepan and add 3 cups of water. Bring to a low simmer and keep warm while you start to prepare the sausage and rice.

5. In a large saucepan (I used my Dutch oven) over medium heat, cook the chopped onion and sausage until the sausage is just browned. (I squeezed the sausage directly out of the casing into the pot and broke up the chunks with a wooden spoon.)

6. Add the rice to the onion/sausage mixture and stir, about one minute.

7. Add the wine and stir for another minute or until the wine is absorbed.

8. Start adding the tomato-water mixture to the rice. Start by adding about two cups of liquid, stirring gently until all the liquid is absorbed. Slowly add one cup of liquid at a time, stirring slowly and letting each cup absorb before adding another. This will take about 25 minutes, and you’ll be done either when all the liquid is gone or when the rice is creamy and tender.

9. Turn off the heat. Working in batches, stir in the spinach until wilted. Stir in the butter and parmesan, and add salt and pepper to taste. (I halved the butter from the original recipe, and I’m not actually sure any butter is necessary; if you try it without, report back!) Serve and sprinkle with additional parmesan, if desired.